This post is part of the Korean Apartment Homelab series.
Introduction
Over the past several posts, I have written about hardware, services, Home Assistant, networking, monitoring, costs, and Cloudflare Tunnel. Each of those posts focused on a specific topic, but along the way I accumulated a collection of smaller lessons that did not fit neatly into any single post.
These are the operational details that documentation covers briefly or not at all. The kind of things you figure out after running Proxmox for a while, usually because something behaved differently than you expected.
This post is a collection of those lessons. None of them are dramatic. Most of them would have saved me an afternoon if someone had written them down.
LXC vs VM: How I Decide
Proxmox gives you two ways to run services: virtual machines and LXC containers. Both work. Choosing between them is one of the first decisions you make for every new service, and I have settled into a simple framework after getting it wrong a few times.
LXC containers share the host kernel. They are lightweight, start in seconds, and use significantly less memory than a full VM. For most self-hosted services, an LXC container running Debian or Ubuntu is more than enough. Nginx Proxy Manager, AdGuard Home, Zigbee2MQTT, Grafana, Prometheus — all of these run perfectly in LXC containers on my server.
VMs run their own kernel inside a fully emulated environment. They use more resources, take longer to boot, and require more disk space. But they provide complete isolation, which matters in specific situations.
The criteria I use:
Use a VM when the service needs hardware passthrough (TrueNAS with direct HDD access), runs a different operating system (Windows 11), benefits from full OS isolation for stability reasons (Home Assistant, where an update should not risk taking down other services), or requires features that depend on a full kernel (Immich and Nextcloud, which use enough system-level functionality that LXC constraints become annoying).
Use an LXC container for everything else. If a service is a straightforward application that runs on Linux, listens on a port, and does not need special hardware access, LXC is almost always the right choice. The resource savings add up quickly when you are running a dozen services on a single machine.
The one exception worth mentioning is services that started as Home Assistant add-ons. Zigbee2MQTT and Mosquitto originally ran inside Home Assistant, which meant a crash in one could take down the other. Moving them into separate LXC containers was one of the best stability improvements I made. The overhead of running them independently is negligible, and the isolation is worth it.
qcow2 vs raw on NVMe
When you create a VM disk in Proxmox, you choose between qcow2 and raw formats. qcow2 supports snapshots, thin provisioning, and copy-on-write. raw is a flat disk image with no metadata overhead.
I originally created my VMs with qcow2. Recently, while setting up a Windows 11 VM, I looked at the existing VM configurations and decided to convert TrueNAS and Nextcloud to raw as well. The reasoning was simple: raw should be slightly faster because there is no copy-on-write layer to traverse.
In practice, on NVMe storage, I noticed no difference whatsoever.
This makes sense when you think about it. The overhead of qcow2’s metadata management is measured in microseconds. NVMe drives handle hundreds of thousands of IOPS. The qcow2 overhead is lost in the noise. And in my setup, the actual data for both TrueNAS and Nextcloud lives on HDDs passed through to the VM, so the VM disk image on the NVMe only holds the operating system and application files. The bottleneck is always the HDD, never the VM disk format.
If your VM disks are on spinning drives or slower SATA SSDs, the format choice might matter more. On NVMe, pick whichever format offers the features you want. If you value snapshots and thin provisioning, stay with qcow2. If you prefer simplicity and do not need those features, raw is fine. Just do not expect a performance revelation from switching.
The Ballooning Lesson
This one cost me more confusion than it should have.
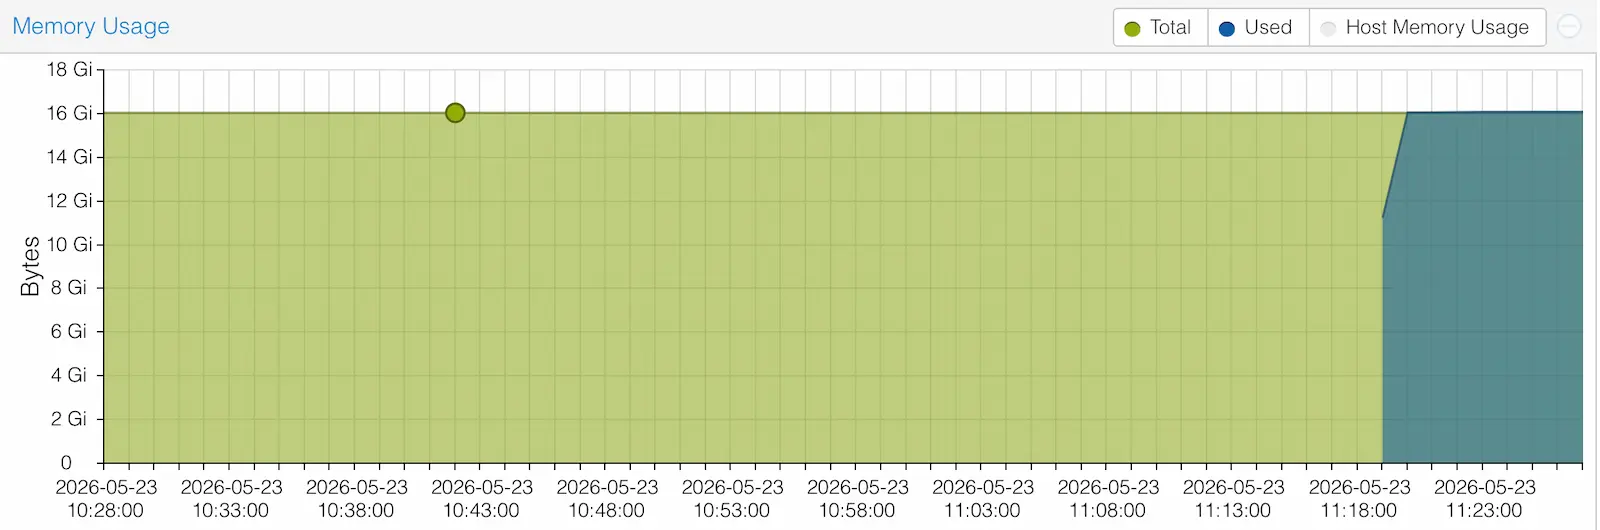
After installing Windows 11 as a VM, I noticed that Proxmox always reported the VM’s memory usage at 100%. Sixteen gigabytes allocated, sixteen gigabytes used. Constantly. Even when Windows was sitting idle.
My first assumption was that Windows 11 was genuinely consuming all 16GB, which seemed excessive but not impossible given Windows’ reputation for memory management. But when I opened Task Manager inside the VM, Windows reported using only about 4GB. The numbers did not match.
The issue turned out to be memory ballooning, or more precisely, the lack of it.
Memory ballooning is a mechanism where the VM reports its actual memory usage back to the hypervisor. The hypervisor can then reclaim unused memory from the VM and make it available to other guests. Without ballooning, the hypervisor has no visibility into what the VM is actually using. It allocates the full amount and reports it as fully consumed, because from the host’s perspective, it is.
I had installed the VirtIO guest tools package inside Windows, which includes the balloon driver. So I assumed ballooning was working. What I missed was that the ballooning device itself was disabled in the VM’s hardware configuration in Proxmox. The driver was installed inside the guest, but Proxmox was not exposing the device for it to talk to.
The fix was a single checkbox: VM → Hardware → Memory → Ballooning Device. Enabled it, rebooted the VM, and memory reporting immediately became accurate. Windows idle usage dropped to around 2.7GB as seen from Proxmox, and the remaining memory was returned to the host.
The lesson is that the driver and the device are two separate things. Installing guest tools handles the driver side. But if the Proxmox-side device is not enabled, the driver has nothing to communicate with. It is an easy thing to overlook, especially if you assume that one implies the other.
Managing Swap on the Host
With the ballooning issue resolved, a second problem disappeared at the same time.
For context, my server has 64GB of RAM. With all services running except Windows, memory usage sits at roughly 50%. When I previously launched the Windows VM with ballooning disabled, the VM claimed 16GB regardless of actual usage. That pushed total memory consumption well above what the host could handle comfortably, and the Linux kernel responded by swapping.
I had set vm.swappiness to 1, which should minimize swap usage. And it does — under normal conditions. But swappiness is a preference, not an absolute rule. When the kernel genuinely runs out of free memory, it will swap regardless of the swappiness value. With a 16GB VM consuming its full allocation even while mostly idle, the kernel had no choice.
I also noticed that even without the Windows VM running, a small amount of swap (around 14MB) appeared on the host. This happened after I converted some VM disks from qcow2 to raw, and I initially wondered if the conversion was responsible. It was not. A few megabytes of swap on a Linux system is normal behavior. The kernel may swap out pages that have not been accessed in a long time, even when free memory is available. This is not a problem. It is the kernel optimizing memory usage.
Once ballooning was enabled, launching Windows no longer caused the host to swap. The VM starts by briefly claiming its full 16GB, but within minutes the balloon driver reports actual usage and the host reclaims the difference. Memory usage with Windows running now peaks around 80% and settles back down, with no swap activity.
For LXC containers, I set swap to 0 in each container’s configuration. LXC containers share the host kernel, so their swap usage comes from the host’s swap space. Setting it to 0 prevents individual containers from contributing to host-level swap pressure. This is a simple setting in each container’s resources configuration, and I recommend it for any homelab where you want predictable memory behavior.
Grafana Alerts and On-Demand VMs
In a previous post, I described the alerting setup I built with Grafana and Telegram. One of the alert rules monitors whether expected VMs are running, and sends a notification when any VM goes down.
This worked perfectly until I added Windows 11.
The Windows VM is not a permanent service. I start it when I need it and shut it down when I am done. But Grafana does not know that. Every time I shut down the VM, my phone buzzed with a “VM DOWN” alert. Every time.
The fix depends on how your alert rule is structured. If the rule queries pve_exporter for VM status, you can filter by VM ID or name to exclude specific guests. In my case, I added a condition to the PromQL query that excludes the Windows VM’s ID from the alert evaluation. The exact approach varies depending on how you built your alert rules, but the principle is the same: on-demand VMs need to be treated differently from always-on services.
This is worth thinking about before you add the VM, not after your phone has buzzed twelve times on a Saturday afternoon.
VM Console vs LXC Console: Why Copy-Paste Breaks
One of the small frustrations I encountered early on was the difference in console behavior between LXC containers and VMs in the Proxmox web interface.
LXC consoles in Proxmox use xterm.js, which is essentially a terminal emulator running in the browser. Text is text. You can select, copy, paste, and drag just like any terminal application. It works exactly as you would expect.
VM consoles use noVNC, which is a completely different technology. noVNC streams the VM’s display as a graphical framebuffer — essentially a live video feed of the screen. When you see text in a VM console, you are not looking at selectable text. You are looking at pixels that happen to form letters. That is why copy-paste does not work the way you expect: there is no text to copy, only an image of text.
Once I understood this distinction, I stopped trying to use VM consoles for anything beyond initial setup and troubleshooting boot issues. For day-to-day management, SSH is the answer.
I use iTerm2 on my Mac to SSH into VMs and the Proxmox host. Multiple tabs, split panes, and proper clipboard support make it a dramatically better experience than the web console. For anyone coming from the Proxmox web interface and finding VM management clunky, the solution is not a better console viewer. The solution is SSH.
Cloning and Snapshots: The Underrated Feature
This might be the Proxmox feature I appreciate the most, and it rarely gets mentioned in homelab discussions.
When I need to change a service configuration, test an update, or troubleshoot an issue, I do not work on the live system. I clone the VM or container, make changes on the clone, and verify everything works before touching the original. If the change works, I apply it to the production instance. If it breaks, I delete the clone and nothing was affected.
This workflow sounds obvious if you come from a professional infrastructure background, but it is genuinely transformative for a homelab. The cost of experimentation drops to nearly zero. A clone takes seconds for an LXC container and a few minutes for a VM. There is no risk and no downtime.
Snapshots serve a similar purpose for smaller changes. Before running an update on Home Assistant or Nextcloud, I take a snapshot. If the update causes problems, I roll back to the snapshot in seconds. It is the undo button for infrastructure.
The combination of cloning and snapshots is honestly one of the strongest arguments for running Proxmox over bare-metal Docker or a NAS operating system. The ability to treat every change as reversible changes how you approach maintenance entirely.
Community Scripts for LXC Deployment
Several of my LXC containers were created using community helper scripts rather than manual installation. These scripts automate the entire process: creating the container, installing the service, and configuring basic settings.
The most well-known collection is the Proxmox VE Helper Scripts project on GitHub. I used these scripts to deploy Cloudflared, Nginx Proxy Manager, and several other services. Each script typically takes a few minutes to run and produces a working container with the service ready to configure.
There is one important caveat I learned the hard way during the Cloudflare Tunnel setup. When you copy an installation command from a guide, make sure the URL points to the raw script file on GitHub, not the project’s website. If you accidentally curl the website URL instead of the raw GitHub URL, bash receives HTML instead of a shell script and silently does nothing. No error, no output, just a blank prompt. It is the kind of mistake that wastes thirty minutes while you question everything about your Proxmox installation.
The correct pattern is always:
bash -c "$(curl -fsSL https://raw.githubusercontent.com/community-scripts/ProxmoxVE/main/ct/<script>.sh)"Community scripts are a significant time-saver, but they are also third-party code running with root privileges. I review the script content before running them and only use scripts from well-maintained, widely-used repositories. The convenience is real, but so is the trust you are placing in the script authors.
HDD Passthrough for TrueNAS
TrueNAS runs as a VM on my server, and the two enterprise HDDs are passed through directly to the VM rather than being presented as virtual disks. This is important because TrueNAS needs direct access to the physical drives to manage its own filesystem (ZFS), monitor drive health through SMART data, and control power management.
The configuration in Proxmox involves identifying the drives by their unique serial numbers and adding them to the VM configuration as raw disk passthrough. Using serial-based identification rather than device paths (like /dev/sda) is critical because device paths can change between reboots, while serial numbers are permanent.
The passthrough has been stable since I set it up. TrueNAS sees the drives as if they were directly connected, SMART monitoring works correctly, and ZFS manages the pool without any virtualization-related issues.
One thing worth noting: if you passthrough drives to a VM, Proxmox itself should not touch those drives. Do not format them in Proxmox, do not add them to a Proxmox storage pool, and do not mount them on the host. The drives belong to the VM exclusively. Mixing access between the host and a VM will eventually lead to data corruption.
Backup Scheduling
Proxmox has built-in backup functionality that is easy to set up and surprisingly capable for a homelab. I run scheduled backups of all critical VMs and LXC containers at 4 AM daily, with a two-week retention policy.
The backup job is configured through Datacenter → Backup in the Proxmox web interface. You select which guests to include, set the schedule, choose the compression level, and define how many backups to keep. Proxmox handles rotation automatically, deleting old backups when the retention limit is reached.
A few practical notes:
The backup process creates a consistent snapshot of the guest, so services continue running during the backup. There is a brief performance impact while the snapshot is being taken, but scheduling backups at 4 AM means nobody notices.
Compression matters more than you might think. A full backup of my Home Assistant VM is several gigabytes uncompressed. With zstd compression, it drops to a fraction of that. Over two weeks of daily backups, the storage savings are significant.
I exclude the Windows VM from scheduled backups because it is not always running and its state changes infrequently. When I make significant changes to the Windows VM, I take a manual backup or snapshot instead.
The current backup destination is the same server’s storage, which protects against software failures and accidental changes but not against hardware failure. A proper off-site backup strategy is something I still need to implement. For now, having any backup at all has already saved me once when a Nextcloud update went wrong and I needed to restore the previous state.
Lessons Learned
Most of these lessons share a common theme: the gap between “technically configured” and “actually working well” is wider than documentation suggests.
Ballooning is a good example. The documentation tells you what it does. It does not tell you that installing guest tools does not automatically enable the device, or that a disabled balloon will silently cause swap problems on the host. You discover that by staring at a Grafana dashboard at midnight wondering why your memory graph looks wrong.
The same pattern applies to VM consoles, backup scheduling, and alert configuration. Each feature works as documented, but the practical implications of how they interact with your specific setup only become clear through experience.
If I had to distill all of this into a single piece of advice, it would be: treat your homelab like a system, not a collection of services. The interactions between components — memory pressure from one VM affecting swap on the host, an alert rule that does not account for on-demand guests, a backup job that competes with other workloads at the wrong time — are where the real complexity lives. Each service in isolation is simple. The system they create together is not.
That complexity is also what makes running Proxmox genuinely educational. Every problem I solved here taught me something about Linux memory management, virtualization internals, or monitoring architecture. A managed cloud service would have hidden all of it. Proxmox shows you everything, whether you are ready for it or not.