This post is part of the Korean Apartment Homelab series.
Introduction
On my old N100 server, storage ran on Xpenology, an unofficial port of Synology’s DSM that turns generic hardware into something that behaves like a Synology NAS. It worked. For almost a year, it did everything I asked of it. But it never stopped making me uneasy.
The problem with Xpenology is not that it breaks. It is that you never quite trust it not to. Every DSM update carried a small question in the back of my mind: is this the one that fails to boot, or loses a volume, or quietly breaks something I will not notice until I need a file that is no longer there? It is an unofficial port running in a configuration its creators never intended. Most of the time that is fine. But “most of the time” is not the feeling you want about the system holding your data.
When I built the new server, I decided storage was the one area where I wanted to stop relying on something I did not fully trust. I had read repeatedly that TrueNAS was the more stable, more legitimate choice, built around ZFS and designed to be exactly what it is rather than an impersonation of something else. So the migration plan was simple: move the data off Xpenology, set up TrueNAS on the new server, and never think about DSM updates again.
The data migration turned out to be the easy part. The part I did not see coming was a network conflict that had nothing to do with storage at all.
The Conflict I Didn’t See Coming
Both servers were running at the same time during the migration. The old N100 with Xpenology, and the new server with its freshly imported VMs. That overlap is where the trouble started.
When I built the new server, I did not recreate every VM from scratch. I brought several over from the N100, carrying their configurations with them. What I did not think about is that a Proxmox VM’s virtual network adapter has a MAC address stored in its configuration, and when you copy the VM, you copy the MAC address along with it. So for a while, I had two different machines on my network, each running a VM with the exact same MAC address.
A MAC address is supposed to be unique on a network. It is the identifier a switch uses to know which physical port a device is behind. When two devices present the same MAC address on the same network, the switch cannot decide where that address actually lives. Its address table flips back and forth between the two ports, and every device downstream of that confusion suffers.
In my case, the symptoms showed up in UniFi. Devices would not be recognized properly. The affected clients kept flickering in and out, appearing and disappearing in the controller. The network was unstable in a way that did not obviously point at a cause, because the cause was not a failing cable or a bad config. It was two virtual machines insisting they were the same device.
There was a second layer to the problem. UniFi can assign a fixed IP to a device based on its MAC address, and I had done exactly that. With two machines sharing a MAC, the fixed IP assignment had no stable target. The network could not consistently decide which machine should get the address.
How I Got Out of It, and the Honest Version of the Fix
Here is what I actually did. I removed the MAC-based fixed IP assignment in UniFi, then rebooted the N100. When it came back up, the network happened to settle, and the N100 got picked up cleanly. The instability stopped, and I was able to bring up Xpenology and start the data copy.
I want to be honest about this, because the easy version of this story would be misleading. Removing the fixed IP assignment and rebooting did not fix the MAC conflict. The duplicate MAC addresses were still there. What I did was remove one symptom (the unstable fixed IP assignment) and get lucky with timing on the reboot, so that things stabilized long enough to do the work. It was a workaround, not a solution.
The actual fix for a duplicate MAC address is to change one of them. In Proxmox, you can regenerate or manually edit the MAC address on a VM’s network device, and the conflict disappears the moment the two machines no longer share an address. I did not do that during the crisis, because the new server was already in use and I was nervous about changing the network identity of a machine I had just started depending on. So I took the workaround instead and told myself I would clean it up afterward.
After the migration was complete, I did exactly that. I changed the MAC addresses on all the VMs on the old N100 server and shut it down. That is what actually resolved the underlying problem.
There is a useful detail buried in this, and it corrects a common misconception. You do not need to change the MAC on both machines. A conflict only exists when two devices share an address on the same network. Change one of them, and the duplication is gone. I left the new server’s VMs with their original MAC addresses and changed only the old server’s, because the old server was the one being retired. The new server’s VMs still run with the MAC addresses they were copied with, and that is completely fine. A copied MAC address is not a problem in itself. The only problem is two of them on the same network at the same time.
If I had not gotten lucky with the reboot workaround, I would have been forced to change a MAC address then and there, and honestly that would have been the better path. The lesson I took away is simple: when you migrate or clone VMs between Proxmox hosts that will run at the same time, deal with the MAC addresses first, before both machines are on the network. It is a thirty-second change that prevents an afternoon of chasing a network problem that looks like everything except what it actually is.
The Data Migration Itself
After the network settled, the actual data move was almost anticlimactic, and that is worth explaining because it shaped the method I chose.
On the N100, I never used Xpenology as serious bulk storage. The machine had a single 512GB SSD, and as I have written before, I treated the NAS more like a working surface than a vault. Files went on, files came off, anything important got copied elsewhere. So the volume of data that actually needed to migrate was small.
That changed the calculation completely. There are elegant ways to move data between two NAS systems. ZFS send and receive can replicate datasets directly. You can rsync over the network from one machine to the other. These are the right tools when you are moving terabytes and want efficiency and verifiability. But for the modest amount of data I had, the simplest possible method was good enough: copy everything from Xpenology to my Mac over the network, then copy it from the Mac onto the new TrueNAS server.
The one wrinkle was space. My Mac did not have enough free storage to hold all of it at once, so partway through I had to spill some of the data onto an external SSD. That left the migration split across two locations, the Mac and the external drive, which made the second half of the move (getting everything onto TrueNAS) more tedious than it should have been. I was reassembling a pile that I had scattered, rather than moving it in one clean pass.
Nothing was lost or corrupted. I had very few files with Korean names, so I did not run into the filename encoding issues that can appear when moving data across macOS and ZFS through an intermediate hop, and there were no permission problems worth mentioning. The migration was simply slower and more manual than it needed to be, entirely because of the storage juggling.
The honest takeaway is that the Mac-as-middleman approach is fine for small amounts of data and a poor choice for large ones. If I had been moving the full 2TB the new server now holds, I would have set up a direct transfer between the machines instead of routing everything through a laptop with a full disk. Match the method to the volume.
There was an unexpected benefit, though. Because I was handling every file by hand instead of replicating a structure wholesale, I ended up looking at everything I owned. The old layout was the result of a year of dumping things wherever was convenient. Rebuilding it on TrueNAS gave me a reason to reorganize, and the structure I have now is genuinely better than what I migrated from. Sometimes the inefficient method has a side effect the efficient one would have skipped.
Setting Up TrueNAS
This is the part that matters most for anyone doing the same thing, so here is how the storage is actually configured rather than a generic walkthrough.
The Pool
The two enterprise 2TB HDDs are configured as a single mirror vdev, passed through to the TrueNAS VM directly. I covered the mechanics of HDD passthrough in the Proxmox tips post, so I will not repeat it here beyond the key point: TrueNAS needs direct access to the physical drives to manage ZFS and read SMART data, so the drives are passed through by serial number rather than presented as virtual disks.
I named the pool home. The convention you will see everywhere in ZFS documentation and tutorials is tank, and I briefly wondered if I was supposed to use it. I am glad I did not. There is no technical meaning to tank whatsoever. It is a habit that propagated from old ZFS examples and never went away. The pool name is just a label, and a label you recognize is better than one you inherited from a manual. I run this at home, so home made immediate sense to me, and that is the only criterion that matters.
Datasets
Rather than dumping everything into the pool root, I split it into datasets by purpose:
- backup — a general-purpose archive where I keep files I want to hold onto
- immich — the storage backend for Immich photos
- media — the movie library for Jellyfin
- nextcloud — file storage for Nextcloud
- proxmox-backup — the destination for Proxmox’s automated VM and container backups
The reason to separate datasets rather than use folders is that in ZFS, datasets are the unit you manage. Each one can have its own properties, its own snapshot schedule, its own quotas, and its own share configuration. Splitting by service means that when I eventually do want per-service snapshot policies, or want to apply a different setting to the media library than to the documents, the boundaries are already in place. It costs nothing to set up now and saves a restructuring later.
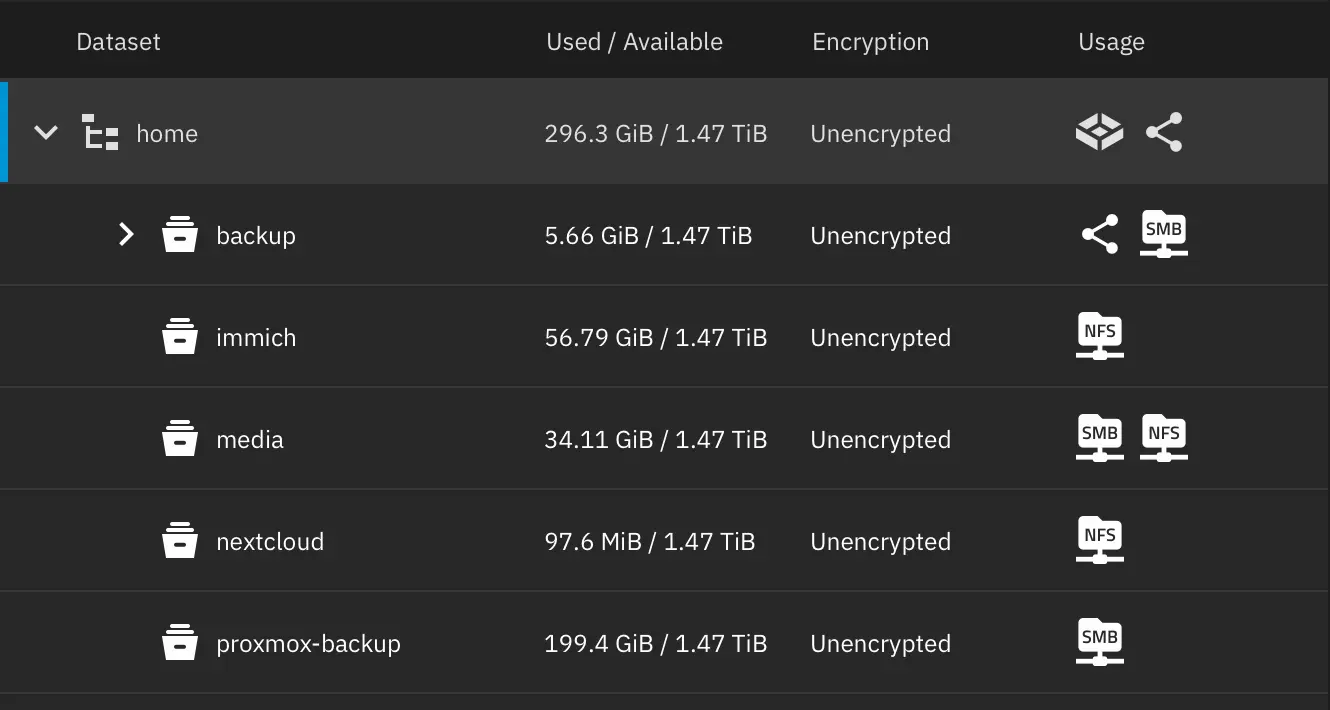
Shares: SMB for the Mac, NFS for the Services
The storage is consumed in two different ways, and they use two different protocols.
My Mac connects over SMB. This is the path I use for manual file access, copying things on and off, and general browsing of the archive. SMB on macOS against TrueNAS was smooth and required no special handling, which was a relief after some of the other migration steps.
The homelab services, on the other hand, mount their datasets over NFS. Immich, Jellyfin, and Nextcloud do not browse files interactively the way I do from the Mac. They need a filesystem mounted into the VM so the application can read and write its data directly. NFS is the natural fit for that machine-to-machine mounting within the local network, and it keeps the service data on the resilient mirror rather than on the VM’s own disk.
This split is the heart of how the storage actually works. TrueNAS is not just a place I occasionally copy files to. It is the storage backend for most of the services in the homelab. The VMs run on NVMe, but the data those services care about — photos, media, documents, backups — lives on the TrueNAS mirror, mounted in over NFS. That is also why, as I explained in the backup post, I do not bother backing up those service VMs themselves: the VM is disposable, and the data it serves is on the mirror.
Data Protection: SMART, Scrubs, and the Snapshot I’m Not Running Yet
ZFS is good at protecting data, but only if you turn the protection on. I configured SMART monitoring so the drives report their health, and I set a scrub schedule that runs on the first of every month at midnight. A scrub reads through all the data in the pool and verifies it against ZFS’s checksums, catching silent corruption before it has a chance to spread. On a mirror, scrubs are the routine maintenance that keeps the redundancy meaningful.
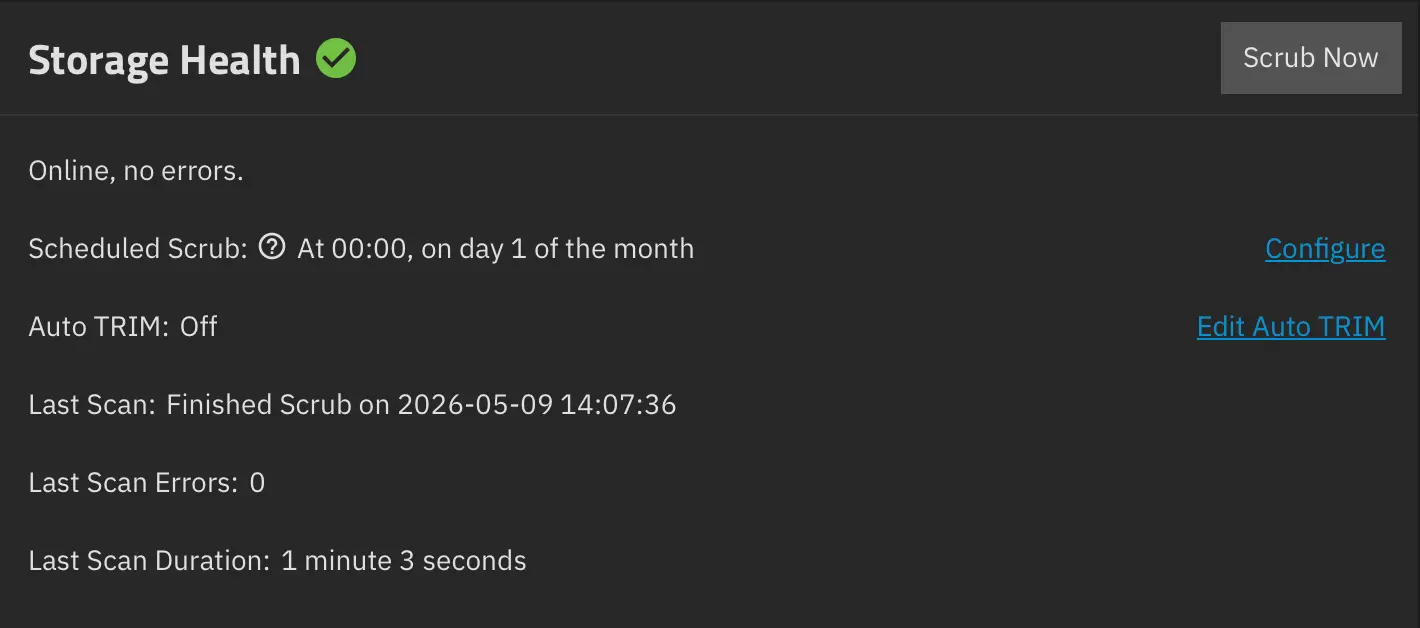
What I am not doing yet is ZFS snapshots. This is a deliberate gap rather than an oversight. As I discussed in the backup post, a mirror protects against drive failure but not against accidental deletion or corruption, because both drives reflect the same state. Snapshots would close part of that gap by letting me roll back to an earlier point in time. The reason I have not set them up is storage capacity. The 2TB mirror is already tight, and snapshots consume space that grows with how much data changes. For now, the truly irreplaceable data has a manual copy on an external SSD, which covers the worst case. When I expand storage, ZFS snapshots are the next thing I will add, and the per-service dataset structure I set up means I can apply different snapshot policies to different datasets when that day comes.
Lessons Learned
Deal with VM MAC addresses before two hosts share a network. Copying a Proxmox VM copies its MAC address. If the source and destination hosts run at the same time, you get a duplicate MAC conflict that manifests as flickering clients and unstable IP assignment, looking like anything except a MAC problem. Regenerate the MAC on one of the machines before both are online. You only need to change one side, because a conflict is a duplication, not a property of the address itself.
A workaround that works is not the same as a fix. Removing the fixed IP assignment and rebooting got me out of the immediate crisis, but it did not resolve the duplicate MAC. If you find yourself lucky enough to stabilize a problem without understanding why, treat that as borrowed time and apply the real fix afterward. I changed the old server’s MAC addresses once the migration was done, which is what actually solved it.
Match the migration method to the data volume. Routing files through a Mac was fine because I had very little data. For terabytes, it would have been a mistake, made worse by a laptop that ran out of space mid-copy. Direct transfer or ZFS send/receive is the right call once the volume is non-trivial.
Pool and dataset names are for you, not for tradition. tank means nothing. Name the pool something you recognize. Splitting datasets by service costs nothing now and gives you per-service control over snapshots, quotas, and shares later.
Turn on the protection ZFS offers. SMART monitoring and scheduled scrubs are not optional extras; they are what make the redundancy real. Snapshots are the next layer, and worth planning for even if storage constraints mean deferring them.
What’s Next
The clear next step for storage is capacity. The 2TB mirror is the constraint behind several decisions in this post: no snapshots yet, Immich running in parallel with iCloud rather than replacing it, and a media library that has to be curated rather than collected freely. Larger drives would unlock ZFS snapshots, make a full migration away from iCloud realistic, and give the services room to grow.
The deeper change this migration represents is the shift from a NAS I tolerated to one I trust. With Xpenology, storage was the part of the homelab I was quietly braced for. With TrueNAS, it has become the boring, reliable foundation that everything else mounts on top of, which is exactly what storage should be. The MAC address detour was an unwelcome surprise, but the destination was worth it.
The homelab keeps growing, one layer at a time.